Learning how to encapsulate your crawl space is probably far from the most exciting item on your weekend to-do list. However, if you’re noticing musty odors or seeing higher-than-usual energy bills, it might be time to roll up your sleeves. Crawl space encapsulation is a proactive step that can safeguard your home from moisture-related issues, improve air quality, and increase energy efficiency.
Throughout this guide, we’ll walk you through the why and how of crawl space encapsulation, making sure you have the knowledge and confidence to tackle the project. Whether you’re an experienced DIY enthusiast or new to home maintenance, a planned, segmented approach will clarify the process, enabling you to create a healthier living environment this weekend.
What is Crawl Space Encapsulation?
At its core, to encapsulate a crawl space is to protect it from moisture, pests, and other external elements. Think of it like weatherproofing your basement, except the focus is on the crawl space, which is just as crucial.
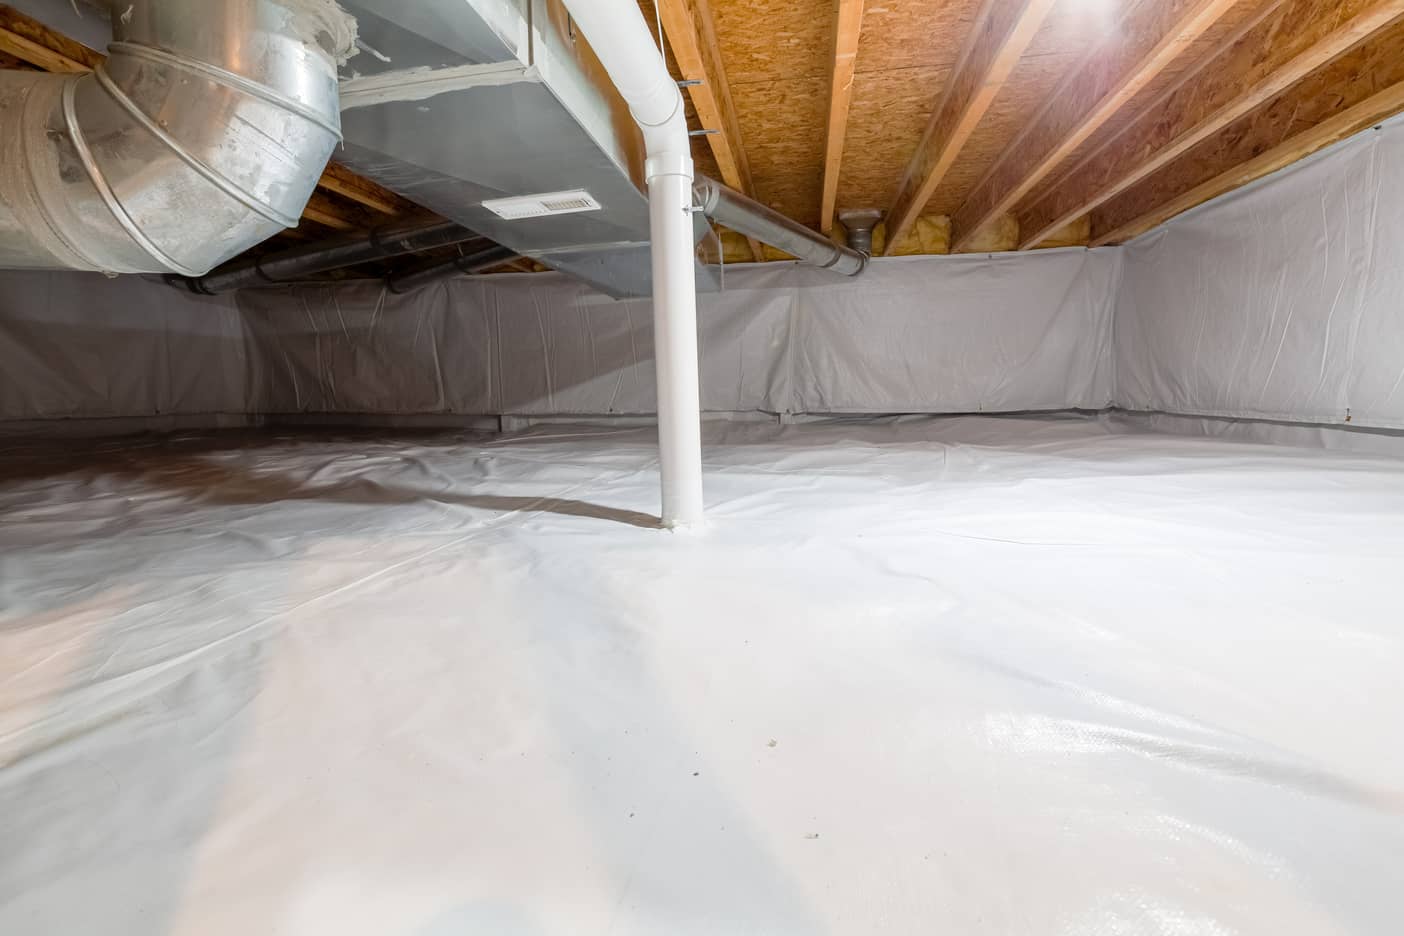
The process includes covering the floor and walls of your crawl space with a heavy-duty polyethylene barrier. This barrier is meticulously sealed and sometimes extended to cover the foundation walls and piers, essentially wrapping the area in a moisture-resistant envelope. The goal is to lock out moisture and its accompanying problems, such as mold, wood rot, and insect infestations.
Encapsulation also typically involves conditioning the space to control humidity levels. This is often achieved through the use of dehumidifiers or conditioning systems, ensuring the air quality in your crawl space remains stable and healthy.
Crawl space encapsulation is a significant upgrade from the more basic vapor barrier installation. While a vapor barrier might cover just the floor of your crawl space, encapsulation is a comprehensive approach that offers a permanent solution to moisture control and contributes to the overall energy efficiency of your home.
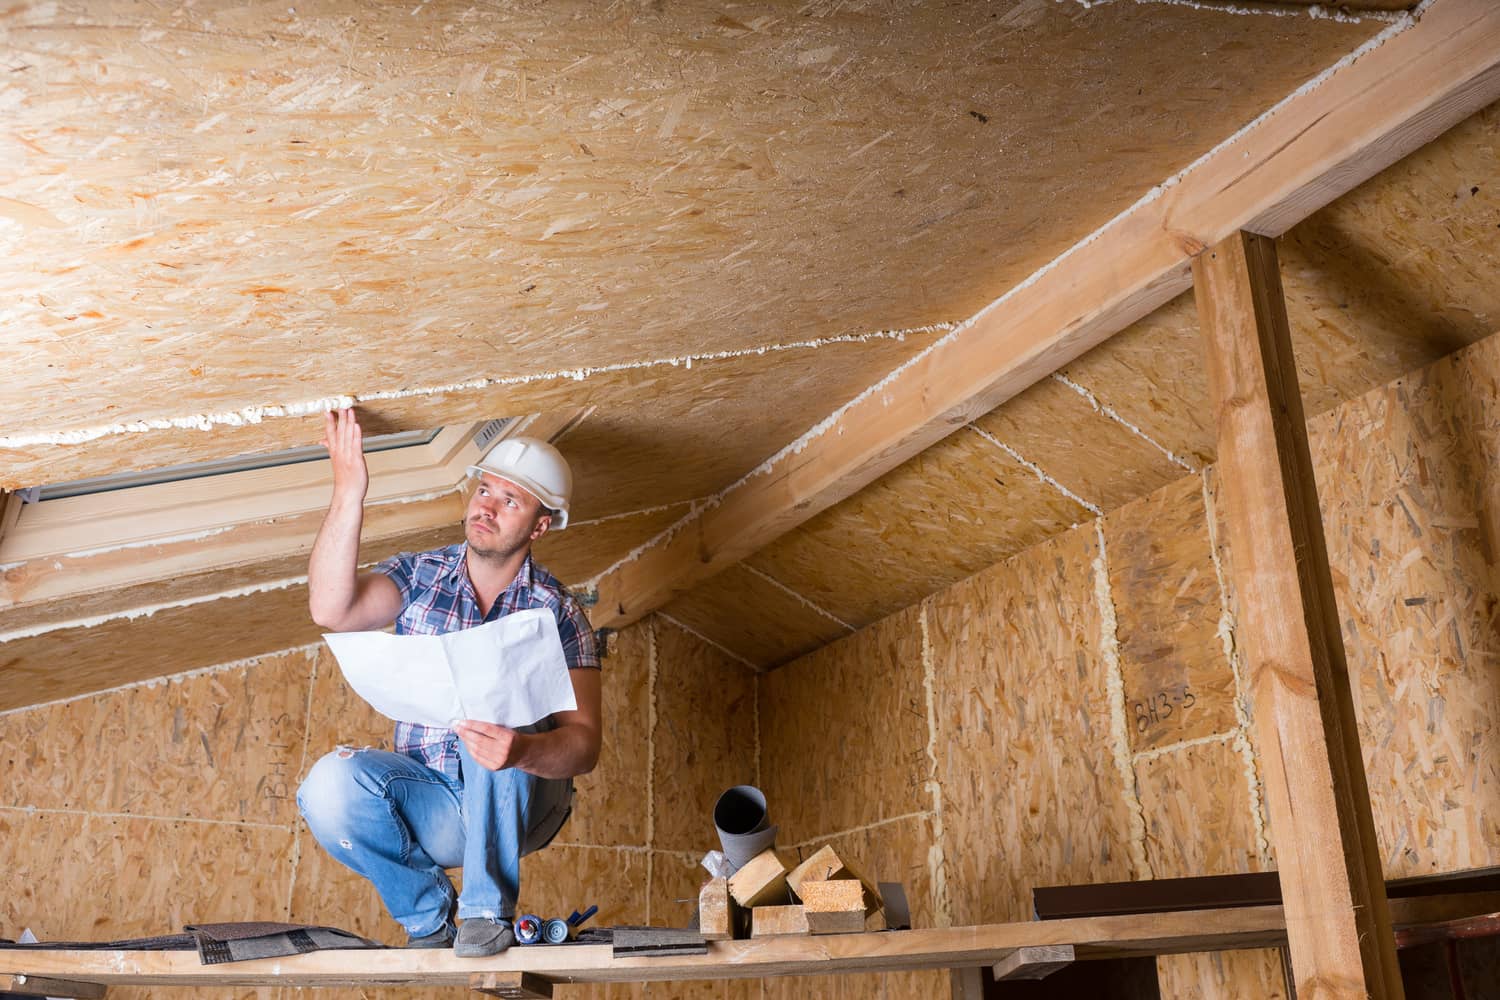
Conduct a Pre-Encapsulation Assessment
Before you start encapsulating your crawl space, taking a look at its current condition is your first step. This initial sets the stage for a successful encapsulation by identifying any issues that need to be addressed beforehand.
Begin by inspecting the crawl space for any signs of moisture, such as standing water or damp soil. Look for mold or mildew growth on wood surfaces, which could indicate an ongoing moisture problem. Also, keep an eye out for structural issues like sagging floors or beams, as these will need to be repaired before encapsulation.
Watch for Pests
Pests can wreak havoc anywhere, but particularly in crawl spaces. Identify any signs of infestation, from insect casings to rodent droppings. Addressing these concerns now can prevent more significant issues after encapsulation.
Measure Humidity Levels
As mentioned above, mold and mildew can be serious issues in a crawl space. A simple hygrometer can help you assess the humidity level in your crawl space. If humidity levels are consistently above 60%, that’s a clear sign that encapsulation could be beneficial.
Prioritize Safety
Don’t forget personal protective equipment. A mask, gloves, and protective clothing are vital, as crawl spaces can expose you to harmful mold spores and other allergens.
Materials Required for Crawl Space Encapsulation
To encapsulate your crawl space smoothly, it’s essential to have all materials and tools ready before you begin. Here’s a concise list of what you’ll need:
- Polyethylene Vapor Barrier: Choose a minimum of 6 mil thickness; 10 to 20 mil is preferred for better durability and puncture resistance.
- Sealing Tape: Acquire tape specifically designed for sealing vapor barriers.
- Butyl Caulk or Foundation Seal Tape: For adhering the barrier to walls and piers.
- Waterproofing Mastic: To seal any protrusions or vents in the crawl space.
- Insulation: For walls (optional, depending on climate and energy goals).
Tools:
- Utility Knife: For cutting the vapor barrier to size.
- Tape Measure: Essential for accurate measurement of the crawl space and vapor barrier.
- Staple Gun and Staples: For attaching vapor barrier to wooden surfaces.
- Caulk Gun: For applying caulk or adhesive.
- Hygrometer: To measure the humidity level before and after encapsulation.
- Safety Gear: Protective suit, gloves, goggles, and a respirator or mask for safety during installation.
Comprehensive Guide to Crawl Space Encapsulation
Embarking on a crawl space encapsulation project can transform the damp underbelly of your home into a dry, energy-efficient space. Below is a streamlined, step-by-step guide to help you achieve professional-level results.
Clear and Prepare the Crawl Space
Start by thoroughly clearing out any debris, objects, and old insulation materials from your crawl space. This cleanup phase is crucial for a clean slate. Address any existing issues such as leaks, structural damage, or pest problems. A well-prepared crawl space ensures the longevity of your encapsulation work.
Level and Insulate (Optional)
Leveling the ground helps prevent water from pooling beneath the vapor barrier. If you’ve decided to insulate the crawl space, now’s the time to install insulation on the walls. This step is optional but recommended for energy conservation and temperature control.
Install the Vapor Barrier
Roll out the polyethylene vapor barrier across the floor, with a generous overlap at the seams to prevent moisture seepage. Extend the barrier up the walls, securing it above the outside soil line, and use sealing tape for all overlaps. The barrier should be anchored securely to the walls and piers with butyl caulk or foundation seal tape. Seal around any protrusions or vents using waterproofing mastic to ensure a moisture-tight seal.
Seal Off Vents and Access Points
Properly seal all crawl space vents and doors. Custom-fit pieces of the vapor barrier can be used to block vents, while a good-quality mastic ensures a sealed environment. For access doors, weather stripping may be necessary to prevent outside air and moisture from entering the encapsulated space.
Condition the Crawl Space Air
With the physical barrier in place, the final step is to manage the crawl space’s climate. Install a dehumidifier to control humidity levels consistently below 60%, which will curb mold growth and further protect your home’s structural integrity.

Recommended Maintenance
Regular maintenance should include a semi-annual inspection, during which you’ll check for any breaches in the vapor barrier, such as tears or areas where it may have come unsealed from the walls or floor. Pay close attention to the condition of the sealing tape and mastic, and promptly repair any areas that have become compromised to maintain the moisture-tight seal.
Monitoring humidity levels is also an ongoing task. Your dehumidifier will play a pivotal role in this, so keep an eye on its performance and settings to ensure it’s functioning as intended. Clean its filters and check for any operational issues that could prevent it from keeping the humidity levels low.
It’s also worth revisiting the crawl space after extreme weather events, such as heavy rain or flooding, to ensure that no water has made its way inside. If your crawl space includes any equipment like HVAC ducts or plumbing, inspect these for leaks or condensation, as they can introduce moisture into the space.
Lastly, be vigilant about pest control. Even after encapsulation, pests can find their way in if the barrier is compromised or if they were already present before the encapsulation.
When to Call a Professional
If during your pre-encapsulation assessment, you uncover extensive mold, structural damage, or persistent water issues that seem beyond superficial fixes, it’s wise to consult a specialist. Professionals have the experience and equipment to handle significant repairs and can ensure that any underlying issues are resolved before encapsulation, preventing future complications.
Additionally, if you are uncomfortable working in confined spaces, lack the necessary tools, or are unsure about the installation process, professional services can provide peace of mind and encapsulate the crawl space for you. This is particularly important as improper installation can lead to gaps in the moisture barrier, resulting in ongoing humidity and pest problems.
Lastly, if after encapsulating your crawl space you notice that humidity levels remain high, or if there’s evidence of moisture or pest intrusion, a professional can diagnose and remedy these issues. They can also help with specialized solutions if your home is in a flood-prone area, ensuring the encapsulation stands up to environmental challenges.
Wrapping Up
In the end, taking the time to encapsulate your crawl space is an investment in your home’s health and comfort.
By following this guide, you’re preventing moisture and pests while also enhancing your living space with better air quality and energy efficiency. A clean, dry crawl space is the foundation of a robust, happy home. However, for guidance in your pre-encapsulation assessment or a full inspection of your home, reach out to All Coast Home Inspections in Houston, TX, and surrounding areas.